> ## Documentation Index
> Fetch the complete documentation index at: https://www.cashfree.com/docs/llms.txt
> Use this file to discover all available pages before exploring further.
# Integrations
> Integrate Cashfree One Click Checkout on Shopify, a custom website, or your mobile app using step-by-step platform guides covering OTP login, COD, and offers.
Select the integration workflow for your platform to set up Cashfree One Click Checkout (OCC).
* **Shopify**: Add One Click Checkout to your Shopify store with OTP sign-in, pre-filled address details, UPI and card payments, cash on delivery (COD), and abandoned cart recovery..
* **Custom website**: Enable One Click Checkout on your existing Cashfree integration by extending the [Create Order API](/docs/api-reference/payments/latest/orders/create) and retrieving order details after payment.
* **Mobile app**: Extend One Click Checkout to your Shopify mobile app using the native Cashfree extension in Appmaker.
Ensure the One Click Checkout product is activated. To activate it, **Log in** to the **[Merchant Dashboard](https://merchant.cashfree.com/auth/login)** and go to **Payment Gateway > PG Products > One Click Checkout**.
Complete setup in the following phases:
| Phase | Description |
| ----------------------- | ---------------------------------------------------------------------------------------------------------------------------------------- |
| **Onboarding** | Send your Shopify collaborator request code to the Cashfree team. You will receive an app installation link within 48 hours. |
| **Installation** | Install the Cashfree OCC app using the link, then connect it to your **[Merchant Dashboard](https://merchant.cashfree.com/auth/login)**. |
| **Theme configuration** | Add a Cashfree snippet to your `theme.liquid` file to activate the checkout experience. |
Before launching, configure shipping rules, COD settings, discounts, and branding in the **[Merchant Dashboard](https://merchant.cashfree.com/auth/login)**.
Follow these steps to onboard and activate One Click Checkout (OCC) on your Shopify store.
### Prerequisites
Before proceeding with the installation, complete the following steps:
1. Complete the [Cashfree support form](https://merchant.cashfree.com/merchants/landing?env=prod\&raise_issue=1) or contact your account manager.
2. Create and share the collaborator request code. Use these steps:
1. **Log in** to your Shopify store using your admin credentials.
2. Navigate to **Settings > Users and permissions**.
3. Scroll down to the **Collaborators** section and copy the collaborator request code.
4. Share your Shopify store URL.
3. Within 48 hours, you receive an app installation link, dashboard details, and setup instructions from Cashfree at your registered email address.
### Installation
To install the OCC app on Shopify:
1. Open the installation link, then **Log in** to Shopify to complete the installation.
2. Shopify redirects you to the **[Merchant Dashboard](https://merchant.cashfree.com/auth/login)** to finalise the installation.
3. To confirm the installation, check the installed apps in Shopify. The app should be listed as `cashfree-occ-`.
4. You can now access your One Click Checkout dashboard.
### Configure theme
Follow these steps to configure checkout on Shopify:
1. **Log in** to Shopify using your credentials.
2. Navigate to **Sales channels > Online Store > Themes**.
3. Select the ellipsis (⋮) next to the live theme, then select **Duplicate** to create a copy.
4. Select the ellipsis (⋮) next to the duplicated theme, then select **Edit code**.
5. Search for and open the `theme.liquid` file.
6. Add the following code before the `` tag:
```liquid theme={"dark"}
{% render 'cashfree' %}
```
7. Select the ellipsis (⋮) next to the duplicated theme, then select **Preview**. Review and confirm the checkout.
8. Select **Publish** to set the updated theme as live.
OCC setup is specific to your Shopify theme. If you change your store's theme, fill out the [Support Form](https://merchant.cashfree.com/merchants/landing?env=prod\&raise_issue=1) to have Cashfree re-configure One Click Checkout on the new theme. International order redirection also needs separate re-configuration on the new theme.
To verify your configuration before launch, complete the [Go Live Checklist](/docs/payments/checkout/checklist).
If you have questions about the Shopify integration, submit a request through the [Cashfree support form](https://merchant.cashfree.com/merchants/landing?env=prod\&raise_issue=1).
1. **Order Creation Requirements**: Ensure the following parameters are passed when [creating an order](https://www.cashfree.com/docs/api-reference/payments/latest/orders/create-order):
Complete setup in the following phases:
| Phase | Description |
| ----------------- | --------------------------------------------------------------------------------------------------------------------------------------------------------------- |
| **Create order** | Add `products.one_click_checkout` and `cart_details` so the checkout session includes OCC features and cart line items. |
| **Order details** | After payment, call the [Get Order Extended API](/docs/api-reference/payments/latest/orders/get-order-extended) for customer context, addresses, and applied offers. |
You must have an existing Cashfree web or app checkout integration before enabling OCC. If you haven't set one up, see [Cashfree Checkout Integration Overview](/docs/payments/overview).
Before launching, validate Create Order payloads and extended order handling in Sandbox, then replicate the same configuration in Production.
Follow these steps to add OCC fields to order creation and to retrieve extended order data after payment:
1. **Add OCC parameters to the [Create Order API](/docs/api-reference/payments/latest/orders/create) request**
Include the following two additional objects in the Create Order API request:
* **`products.one_click_checkout`**: Enables OCC and specifies which features to allow, such as address collection and authentication.
* **`cart_details`**: Provides cart item information to populate the checkout summary.
```bash title="Request sample" theme={"dark"}
curl --location 'https://sandbox.cashfree.com/pg/orders' \
--header 'X-Client-Id: {{clientId}}' \
--header 'X-Client-Secret: {{clientSecret}}' \
--header 'x-api-version: 2025-01-01' \
--header 'Content-Type: application/json' \
--header 'Accept: application/json' \
--data '{
"order_amount": 1,
"order_currency": "INR",
"customer_details": {
"customer_id": "USER123",
"customer_name": "Joe Smith",
"customer_email": "joe.s@cashfree.com",
"customer_phone": "+919999999999"
},
"order_meta": {
"return_url": "https://yourwebsite.com/payment/return?order_id={order_id}"
},
"products": {
"one_click_checkout": {
"enabled": true,
"conditions": [
{
"action": "ALLOW",
"values": [
"checkoutCollectAddress",
"checkoutAuthenticate"
],
"key": "features"
}
]
}
},
"cart_details": {
"cart_items": [
{
"item_id": "cart_id_1",
"item_name": "T Shirt",
"item_description": "Test Description",
"item_details_url": "https://example.com/product/t-shirt",
"item_image_url": "https://example.com/product/t-shirt.jpg",
"item_original_unit_price": 1,
"item_discounted_unit_price": 1,
"item_quantity": 1,
"item_currency": "INR"
}
]
}
}'
```
In the example above, note the following key parameters:
* `products.one_click_checkout.enabled`: Set to `true` to enable OCC.
* `conditions.values`: Specify the features to allow, such as `checkoutCollectAddress` and `checkoutAuthenticate`.
* `cart_details.cart_items`: Specify the product information to display in the checkout summary.
2. **Retrieve extended order details**
Use the [Get Order Extended API](/docs/api-reference/payments/latest/orders/get-order-extended) endpoint after payment to fetch OCC-specific data. The response includes:
* **Customer details**: Information about the logged-in user.
* **Shipping and billing addresses**: Recipient details collected during checkout.
* **Applied offers**: Discounts applied at the time of payment.
The `customer_details` object identifies the logged-in user who placed the order. The `shipping_address` object identifies the delivery recipient. These values may differ if the customer enters a different delivery address during checkout.
Complete setup in the following phases:
| Phase | Description |
| ----------------- | ---------------------------------------------------------------------------------------------------------------------------------------- |
| **Onboarding** | Send your collaborator request code to the Cashfree team. You will receive an app installation link within 48 hours. |
| **Installation** | Install the Cashfree OCC app using the link, then connect it to your **[Merchant Dashboard](https://merchant.cashfree.com/auth/login)**. |
| **Configuration** | Set **Environment** to **Production**, save changes, and create a new app build so customers receive the updated checkout behaviour. |
Before launching, confirm the Shopify OCC app is connected in the **[Merchant Dashboard](https://merchant.cashfree.com/auth/login)** and verify checkout in a staging build where possible.
Follow these steps to install the extension, configure the Production environment, and create a new build:
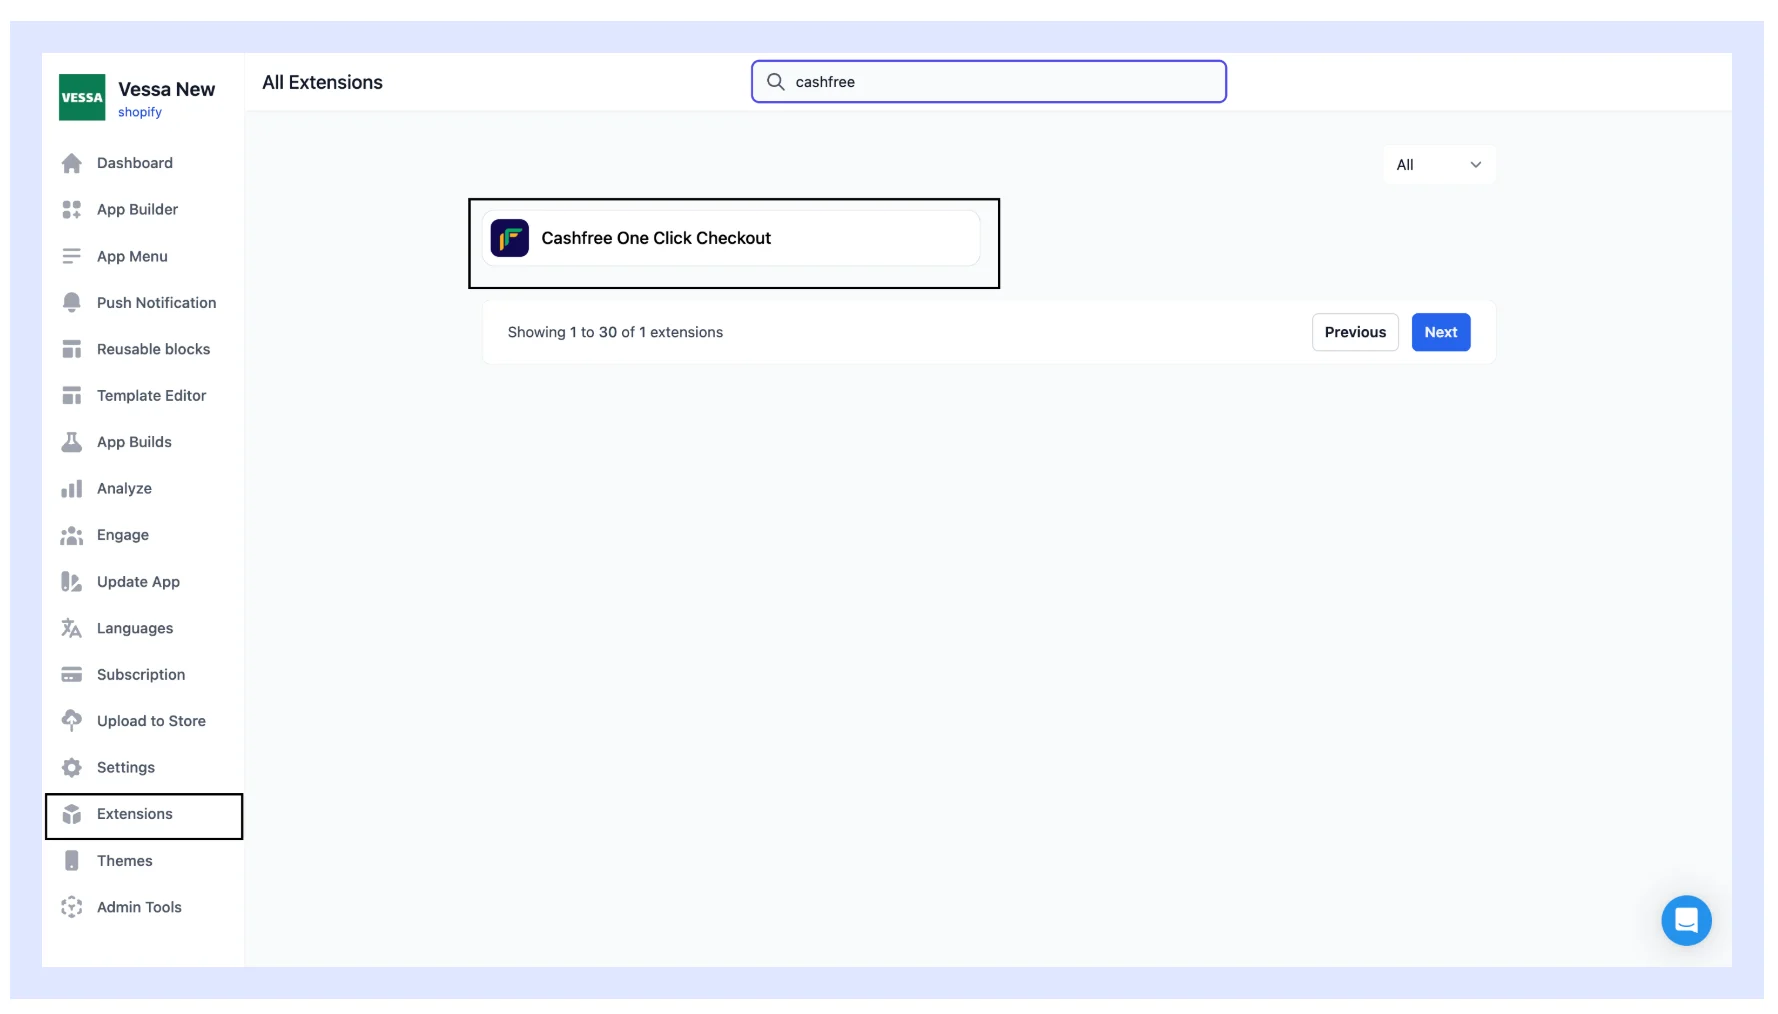
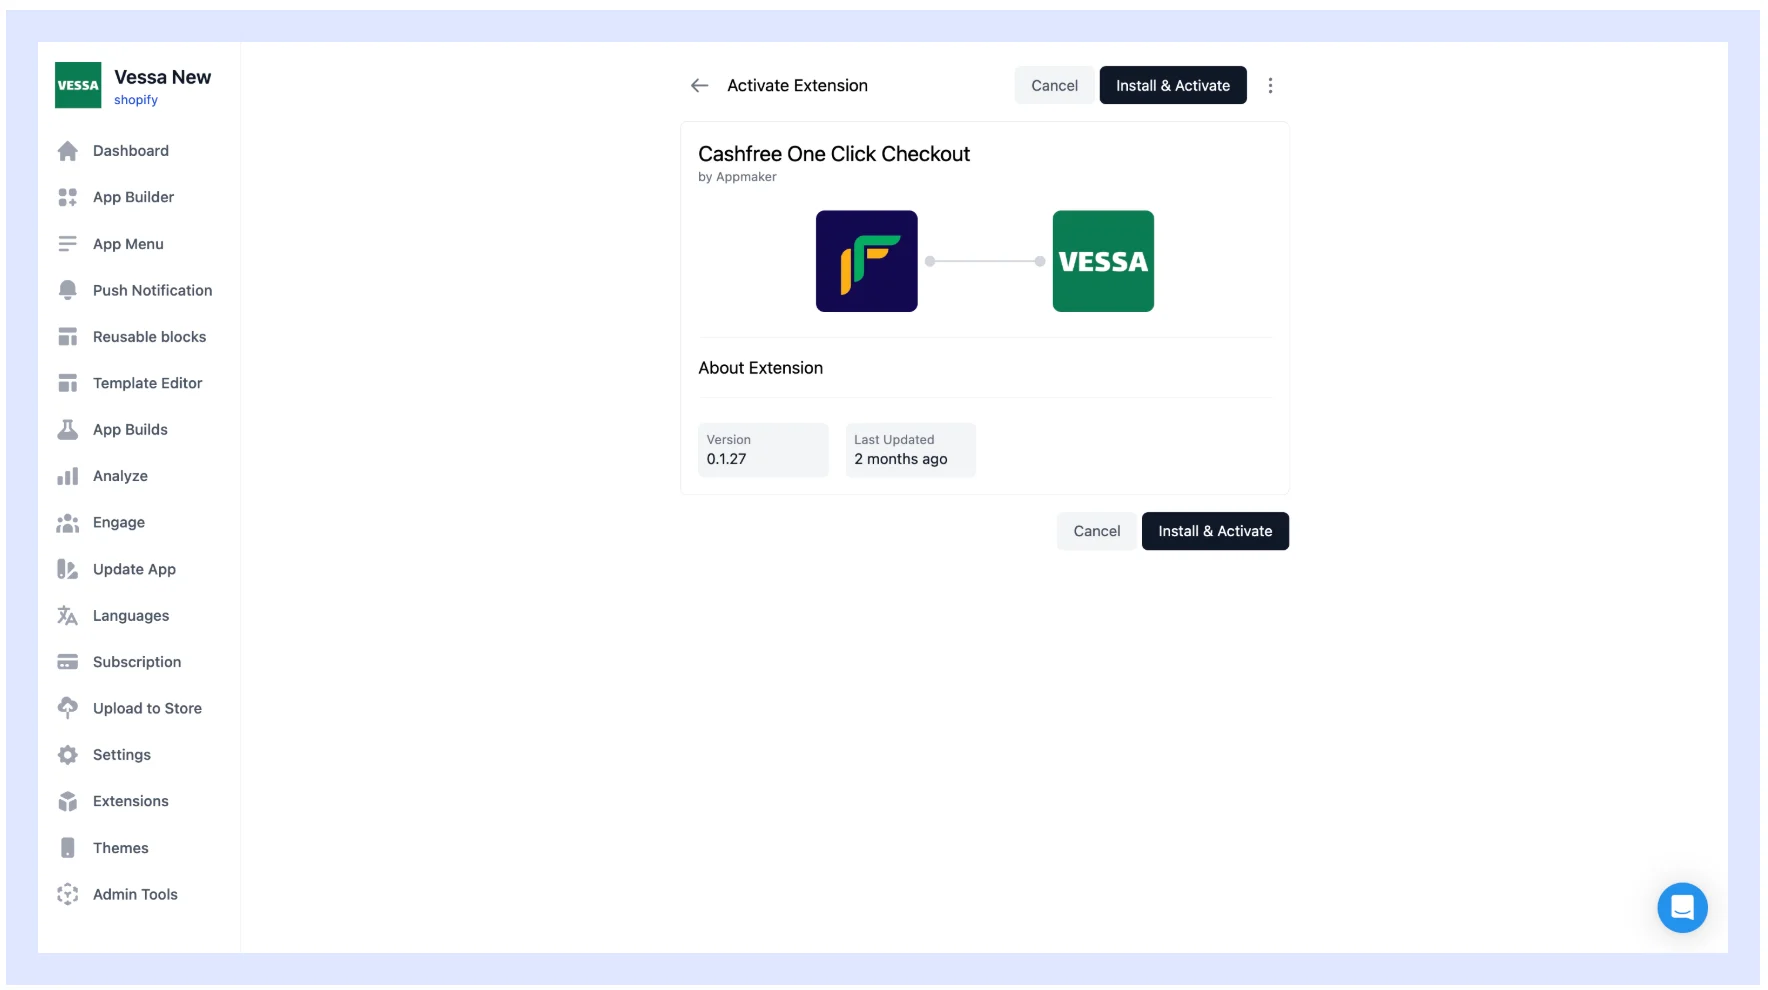
1. In the [Appmaker Dashboard](https://partners.appmaker.xyz), go to **Extensions**.
2. Search for and select **Cashfree One Click Checkout**.
3. Select **Install and activate** in the top-right corner.
4. Open the **Settings** tab and set **Environment** to **Production**.
5. Select **Save Changes**.
6. Create a new app build for the changes to take effect.
To track in-app purchase analytics, set up Firebase and install the **Firebase Extension** in Appmaker. See the [Firebase Extension documentation](https://docs.appmaker.xyz/docs/Extensions/firebase/) for setup steps.
For more information, see the [Appmaker documentation](https://docs.appmaker.xyz/docs/integrations/Cashfree/).
snippets/related-topics-loader.mdx
 2. Search for and select **Cashfree One Click Checkout**.
 3. Select **Install and activate** in the top-right corner.
4. Open the **Settings** tab and set **Environment** to **Production**.
5. Select **Save Changes**.
3. Select **Install and activate** in the top-right corner.
4. Open the **Settings** tab and set **Environment** to **Production**.
5. Select **Save Changes**.
 6. Create a new app build for the changes to take effect.