> ## Documentation Index
> Fetch the complete documentation index at: https://www.cashfree.com/docs/llms.txt
> Use this file to discover all available pages before exploring further.
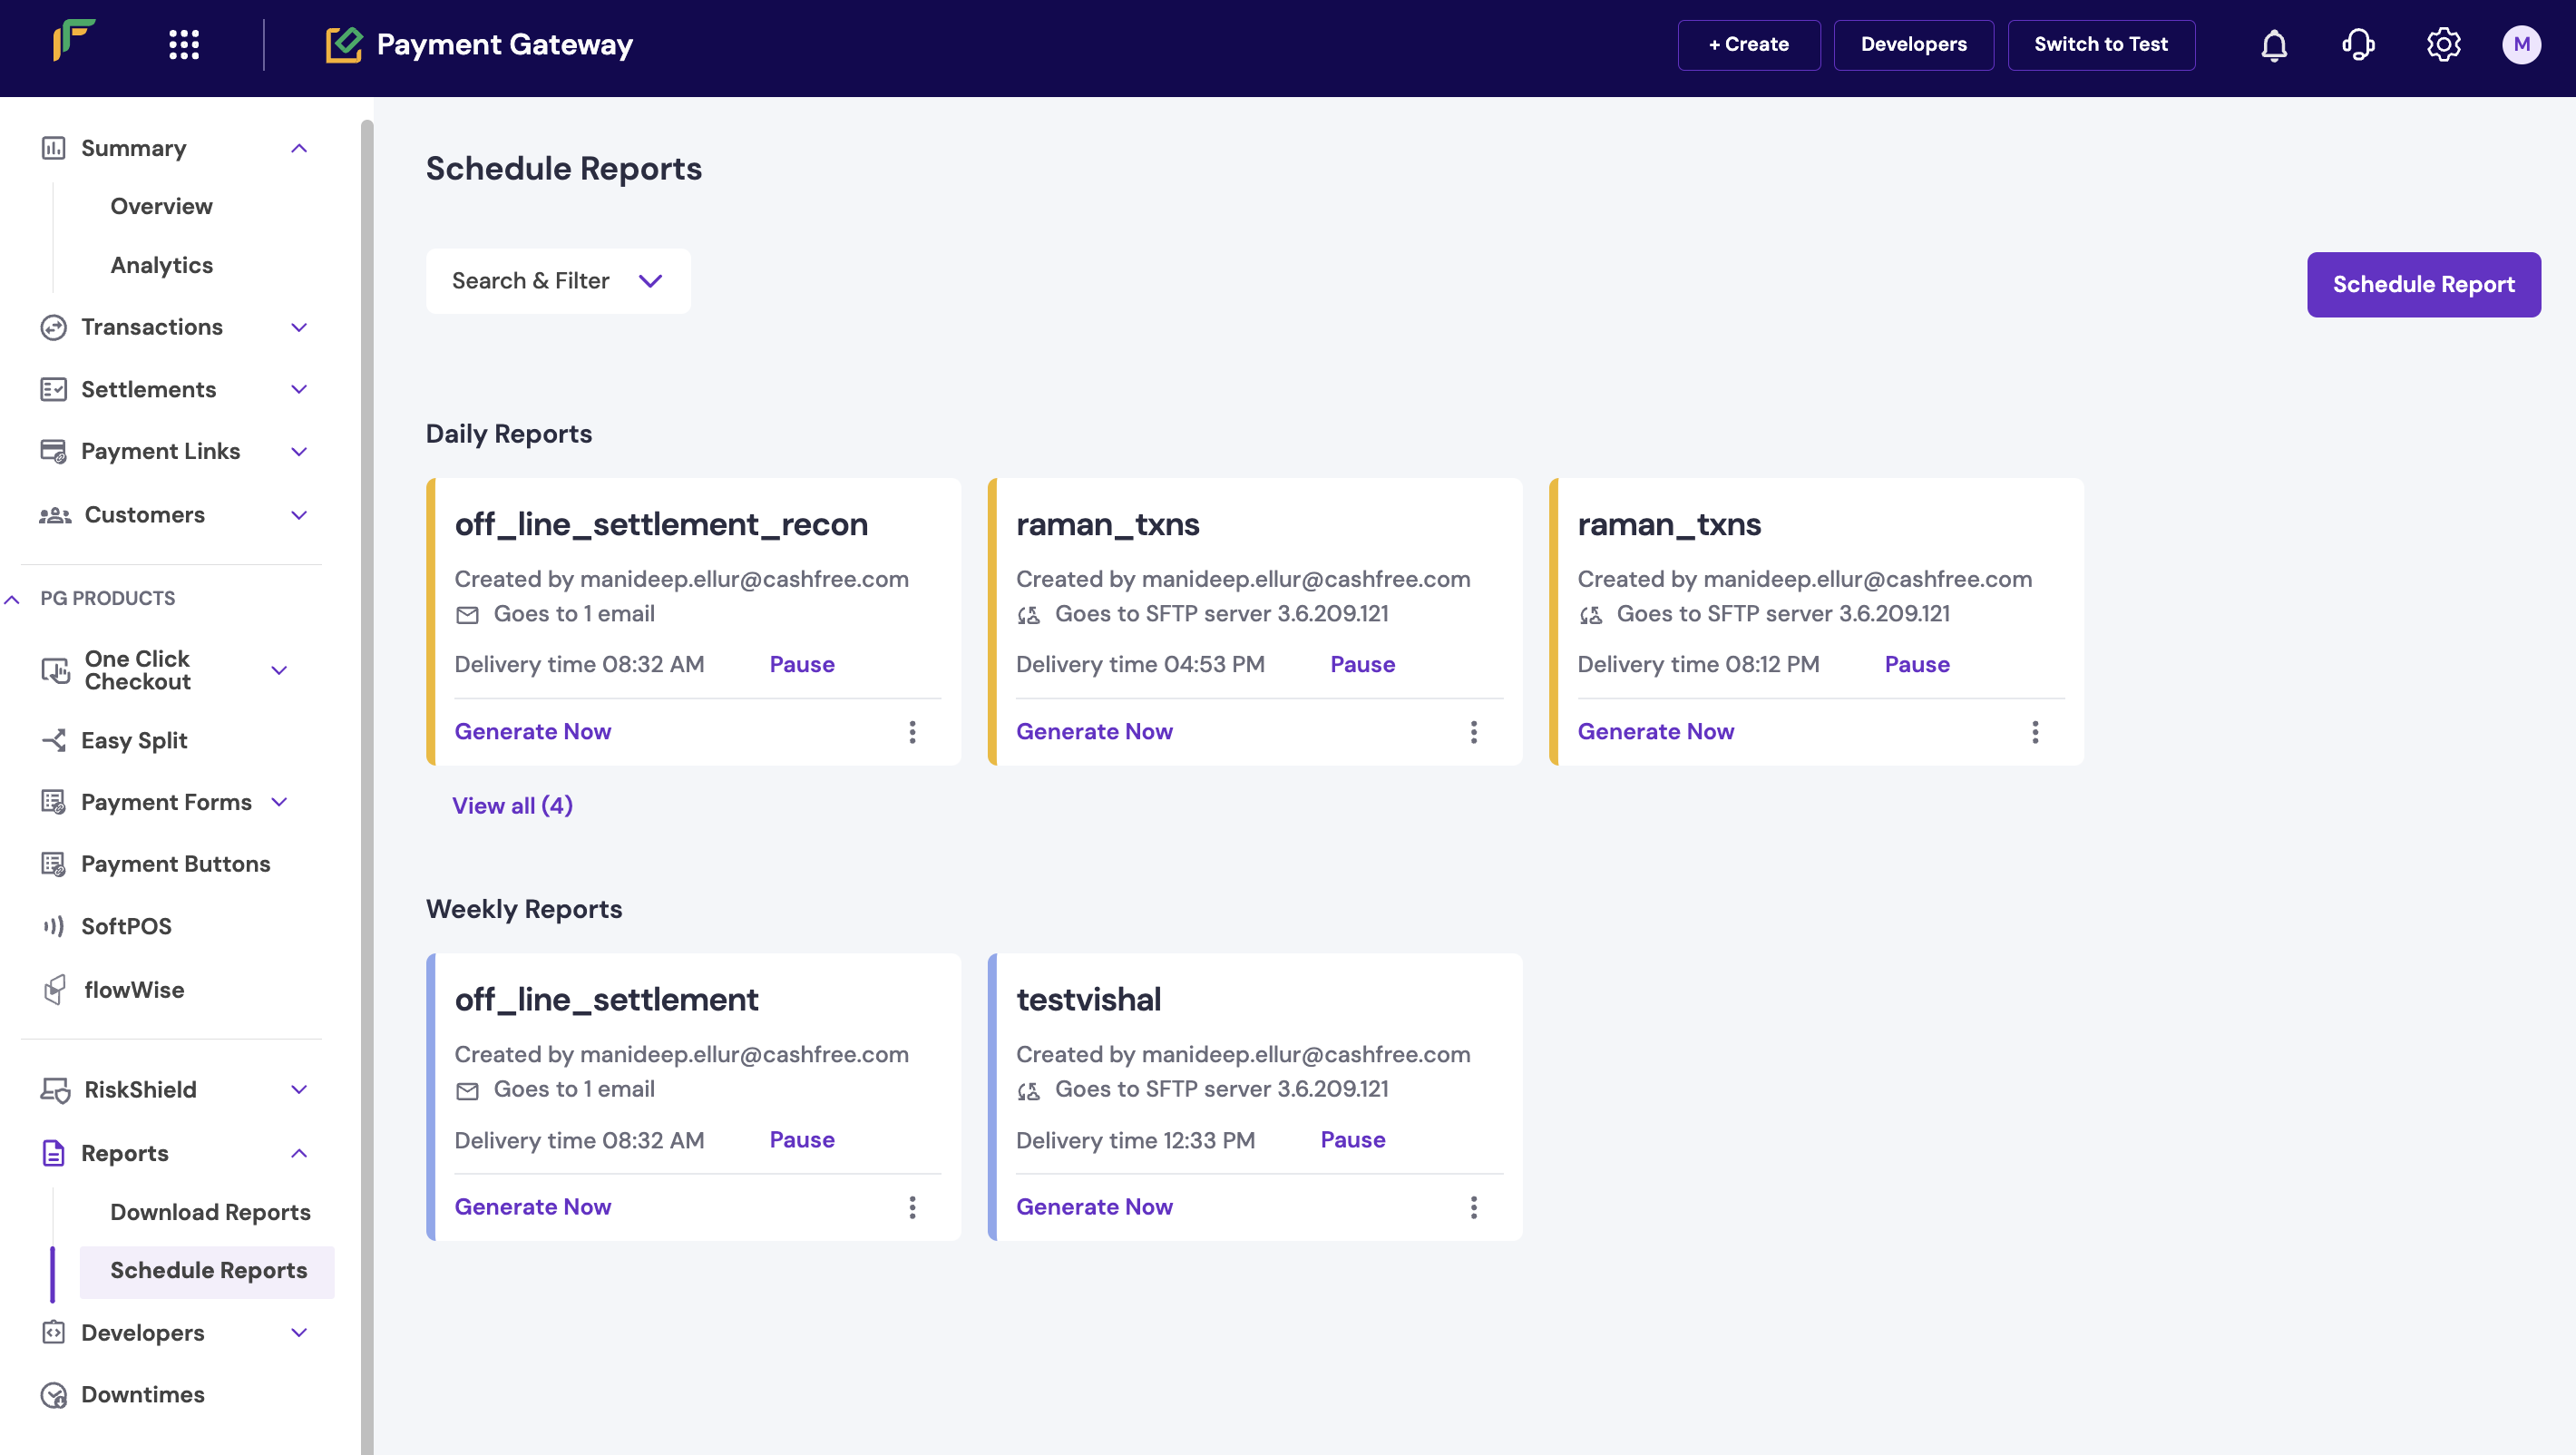
# Schedule Reports
> Schedule recurring Cashfree reports for transactions, settlements, and refunds to land in your inbox or SFTP automatically and remove manual reconciliation.
Use the **Schedule Reports** dashboard to automate the generation and delivery of reports. You can schedule reports to run daily, weekly, or monthly, and choose your preferred report types and formats. The system delivers reports through the Secure File Transfer Protocol (SFTP). You can also generate a sample report in this dashboard before finalising your schedule. These features help you streamline report management and access critical data on time.
## Navigation
To access the Schedule Reports dashboard:
1. Log in to the [Merchant Dashboard](https://merchant.cashfree.com/auth/login).
2. Navigate to **Payment Gateway** > **Reports** > **Schedule Reports**.
The **Schedule Reports** dashboard includes the following sections:
* **Daily Reports**: View reports scheduled to run every day. These reports provide insights into daily performance.
* **Weekly Reports**: View reports scheduled to run every week. Use these for weekly reconciliations and tracking.
* **Monthly Reports**: View reports scheduled to run every month. Use these to review monthly business performance, identify emerging trends, and make informed business decisions.
 If you don't have the Admin role, request access to the Schedule Reports and SFTP Configuration pages through the **User Management** section.
Enable **SFTP Configuration** and **Schedule Reports** from the **User Management** > **Active Users** page.
If you don't have the Admin role, request access to the Schedule Reports and SFTP Configuration pages through the **User Management** section.
Enable **SFTP Configuration** and **Schedule Reports** from the **User Management** > **Active Users** page.
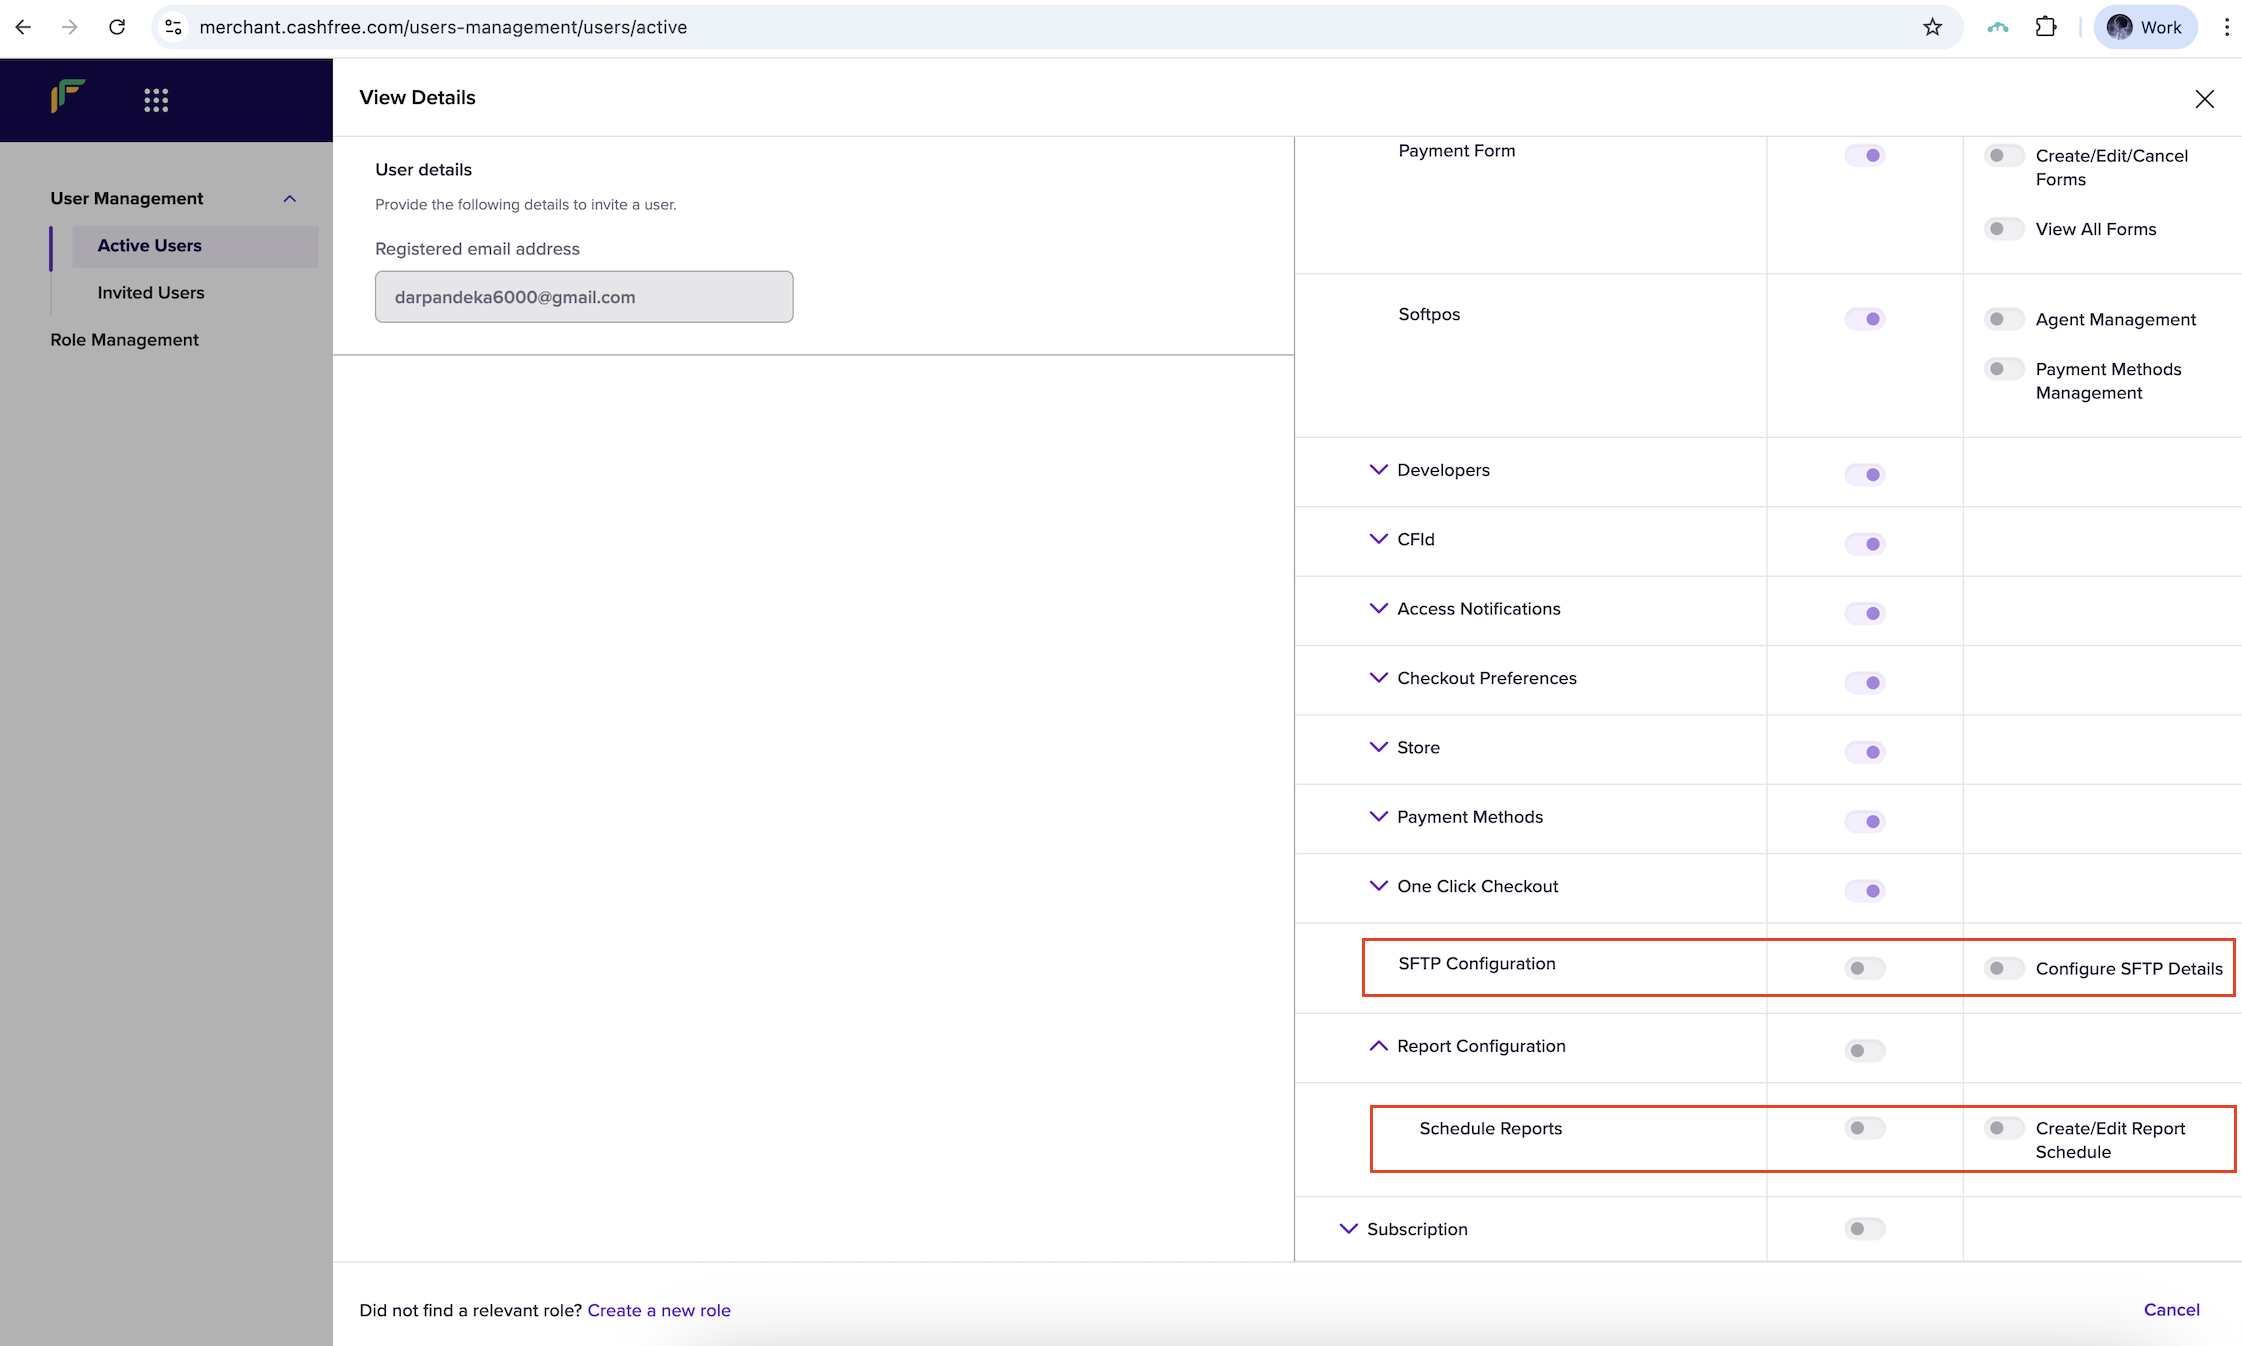 For more information, see [Access Management](/docs/help/account/access-management)
### Features
The dashboard offers the following features:
* **Search and filter**: Find reports by using keywords or filters. Filter options include report type, format, and more.
* **Generate now**: Generate a report instantly. Use this option to preview the reports sent to your SFTP.
## Schedule a report
To schedule a report, follow these steps:
1. Select **Schedule Reports** to open the scheduling pop-up window.
2. In the **Report Details** section, complete the following fields, and then select **Next**:
* **Report Type**: Select the type of report. Available options include:
* **Transactions**
* **Settlement Reconciliation**
* **Disputes**
* **Refunds**
* **Ledger**
* **File Name**: Enter a name for the report file. The system will automatically append the date range of the report to the file name.
* **File format**: Select a file format: `.csv` or `.xlsx`.
3. In the **Delivery schedule** section, complete the following fields, and then select **Next**:
* **Frequency**: Select how often the report is delivered. Options include **Daily**, **Weekly**, or **Monthly**.
* **Data Time Frame**: Select the time for the report data. For example, **Previous Month** or **Current Month**.
* **Time**: Specify the time of day and day of the week (if applicable) for the report delivery.
4. In the **Delivery Channel** section, verify the SFTP details, and then select **Next**.
**Note**:
* Complete the SFTP server configuration with **Cashfree** before scheduling reports.
* If your SFTP server is already configured, proceed to the next step.
* To configure your SFTP server, see [Configuring SFTP server](/docs/payments/manage/schedule-reports#configure-the-sftp-server).
5. Select **Create Schedule** to save your report schedule.
## Configure the SFTP server
Follow these steps to configure your SFTP server for report delivery.
1. Add the following Cashfree IP addresses to your SFTP server’s firewall allowlist:
* `52.66.101.190`
* `3.109.102.144`
* `18.60.134.245`
* `18.60.183.142`
2. Enter the following SFTP server details:
* Host and port
* Username and password
* Target directory for report uploads
The SFTP user must have write permissions for the specified directory.
3. Select **Test Configuration** to verify that the SFTP integration is working correctly.
4. To update the SFTP configuration:
* Select **Edit SFTP Configuration** at the top-right corner of the page.
* Update the required fields in the pop-up form.
5. After editing the details, repeat **Step 3** to confirm that the updated configuration works as expected.
Changes to the SFTP configuration apply to all existing scheduled reports.
For more information, see [Access Management](/docs/help/account/access-management)
### Features
The dashboard offers the following features:
* **Search and filter**: Find reports by using keywords or filters. Filter options include report type, format, and more.
* **Generate now**: Generate a report instantly. Use this option to preview the reports sent to your SFTP.
## Schedule a report
To schedule a report, follow these steps:
1. Select **Schedule Reports** to open the scheduling pop-up window.
2. In the **Report Details** section, complete the following fields, and then select **Next**:
* **Report Type**: Select the type of report. Available options include:
* **Transactions**
* **Settlement Reconciliation**
* **Disputes**
* **Refunds**
* **Ledger**
* **File Name**: Enter a name for the report file. The system will automatically append the date range of the report to the file name.
* **File format**: Select a file format: `.csv` or `.xlsx`.
3. In the **Delivery schedule** section, complete the following fields, and then select **Next**:
* **Frequency**: Select how often the report is delivered. Options include **Daily**, **Weekly**, or **Monthly**.
* **Data Time Frame**: Select the time for the report data. For example, **Previous Month** or **Current Month**.
* **Time**: Specify the time of day and day of the week (if applicable) for the report delivery.
4. In the **Delivery Channel** section, verify the SFTP details, and then select **Next**.
**Note**:
* Complete the SFTP server configuration with **Cashfree** before scheduling reports.
* If your SFTP server is already configured, proceed to the next step.
* To configure your SFTP server, see [Configuring SFTP server](/docs/payments/manage/schedule-reports#configure-the-sftp-server).
5. Select **Create Schedule** to save your report schedule.
## Configure the SFTP server
Follow these steps to configure your SFTP server for report delivery.
1. Add the following Cashfree IP addresses to your SFTP server’s firewall allowlist:
* `52.66.101.190`
* `3.109.102.144`
* `18.60.134.245`
* `18.60.183.142`
2. Enter the following SFTP server details:
* Host and port
* Username and password
* Target directory for report uploads
The SFTP user must have write permissions for the specified directory.
3. Select **Test Configuration** to verify that the SFTP integration is working correctly.
4. To update the SFTP configuration:
* Select **Edit SFTP Configuration** at the top-right corner of the page.
* Update the required fields in the pop-up form.
5. After editing the details, repeat **Step 3** to confirm that the updated configuration works as expected.
Changes to the SFTP configuration apply to all existing scheduled reports.