> ## Documentation Index
> Fetch the complete documentation index at: https://www.cashfree.com/docs/llms.txt
> Use this file to discover all available pages before exploring further.
# Create Relay Agent
> Create an automated Cashfree Relay agent from the Merchant Dashboard by configuring triggers, adding action nodes, mapping data, and activating it.
## Prerequisites
Before you create an agent, confirm the following.
* You have a valid Cashfree Merchant account and can log in to the Merchant Dashboard. If you don't have an account yet, see [Account Activation](/docs/help/account/account-activation#create-account).
* If your agent uses an app-based action (for example, Gmail or Google Sheets), you have set up the required connection under the **Connections** tab. For steps, see [Setting up Connections](/docs/tools-ai/relay/add-connections).
## Create an agent
To create an agent, follow these steps.
Log in to the [Merchant Dashboard](https://merchant.cashfree.com/auth/login), then go to **Relay**. Open the canvas to create a new agent in either of the following ways.
* On the Relay landing page, select **Set up an automation**.
* Go to **View my agents**, then click **Create Agent** on the **Agents** tab.
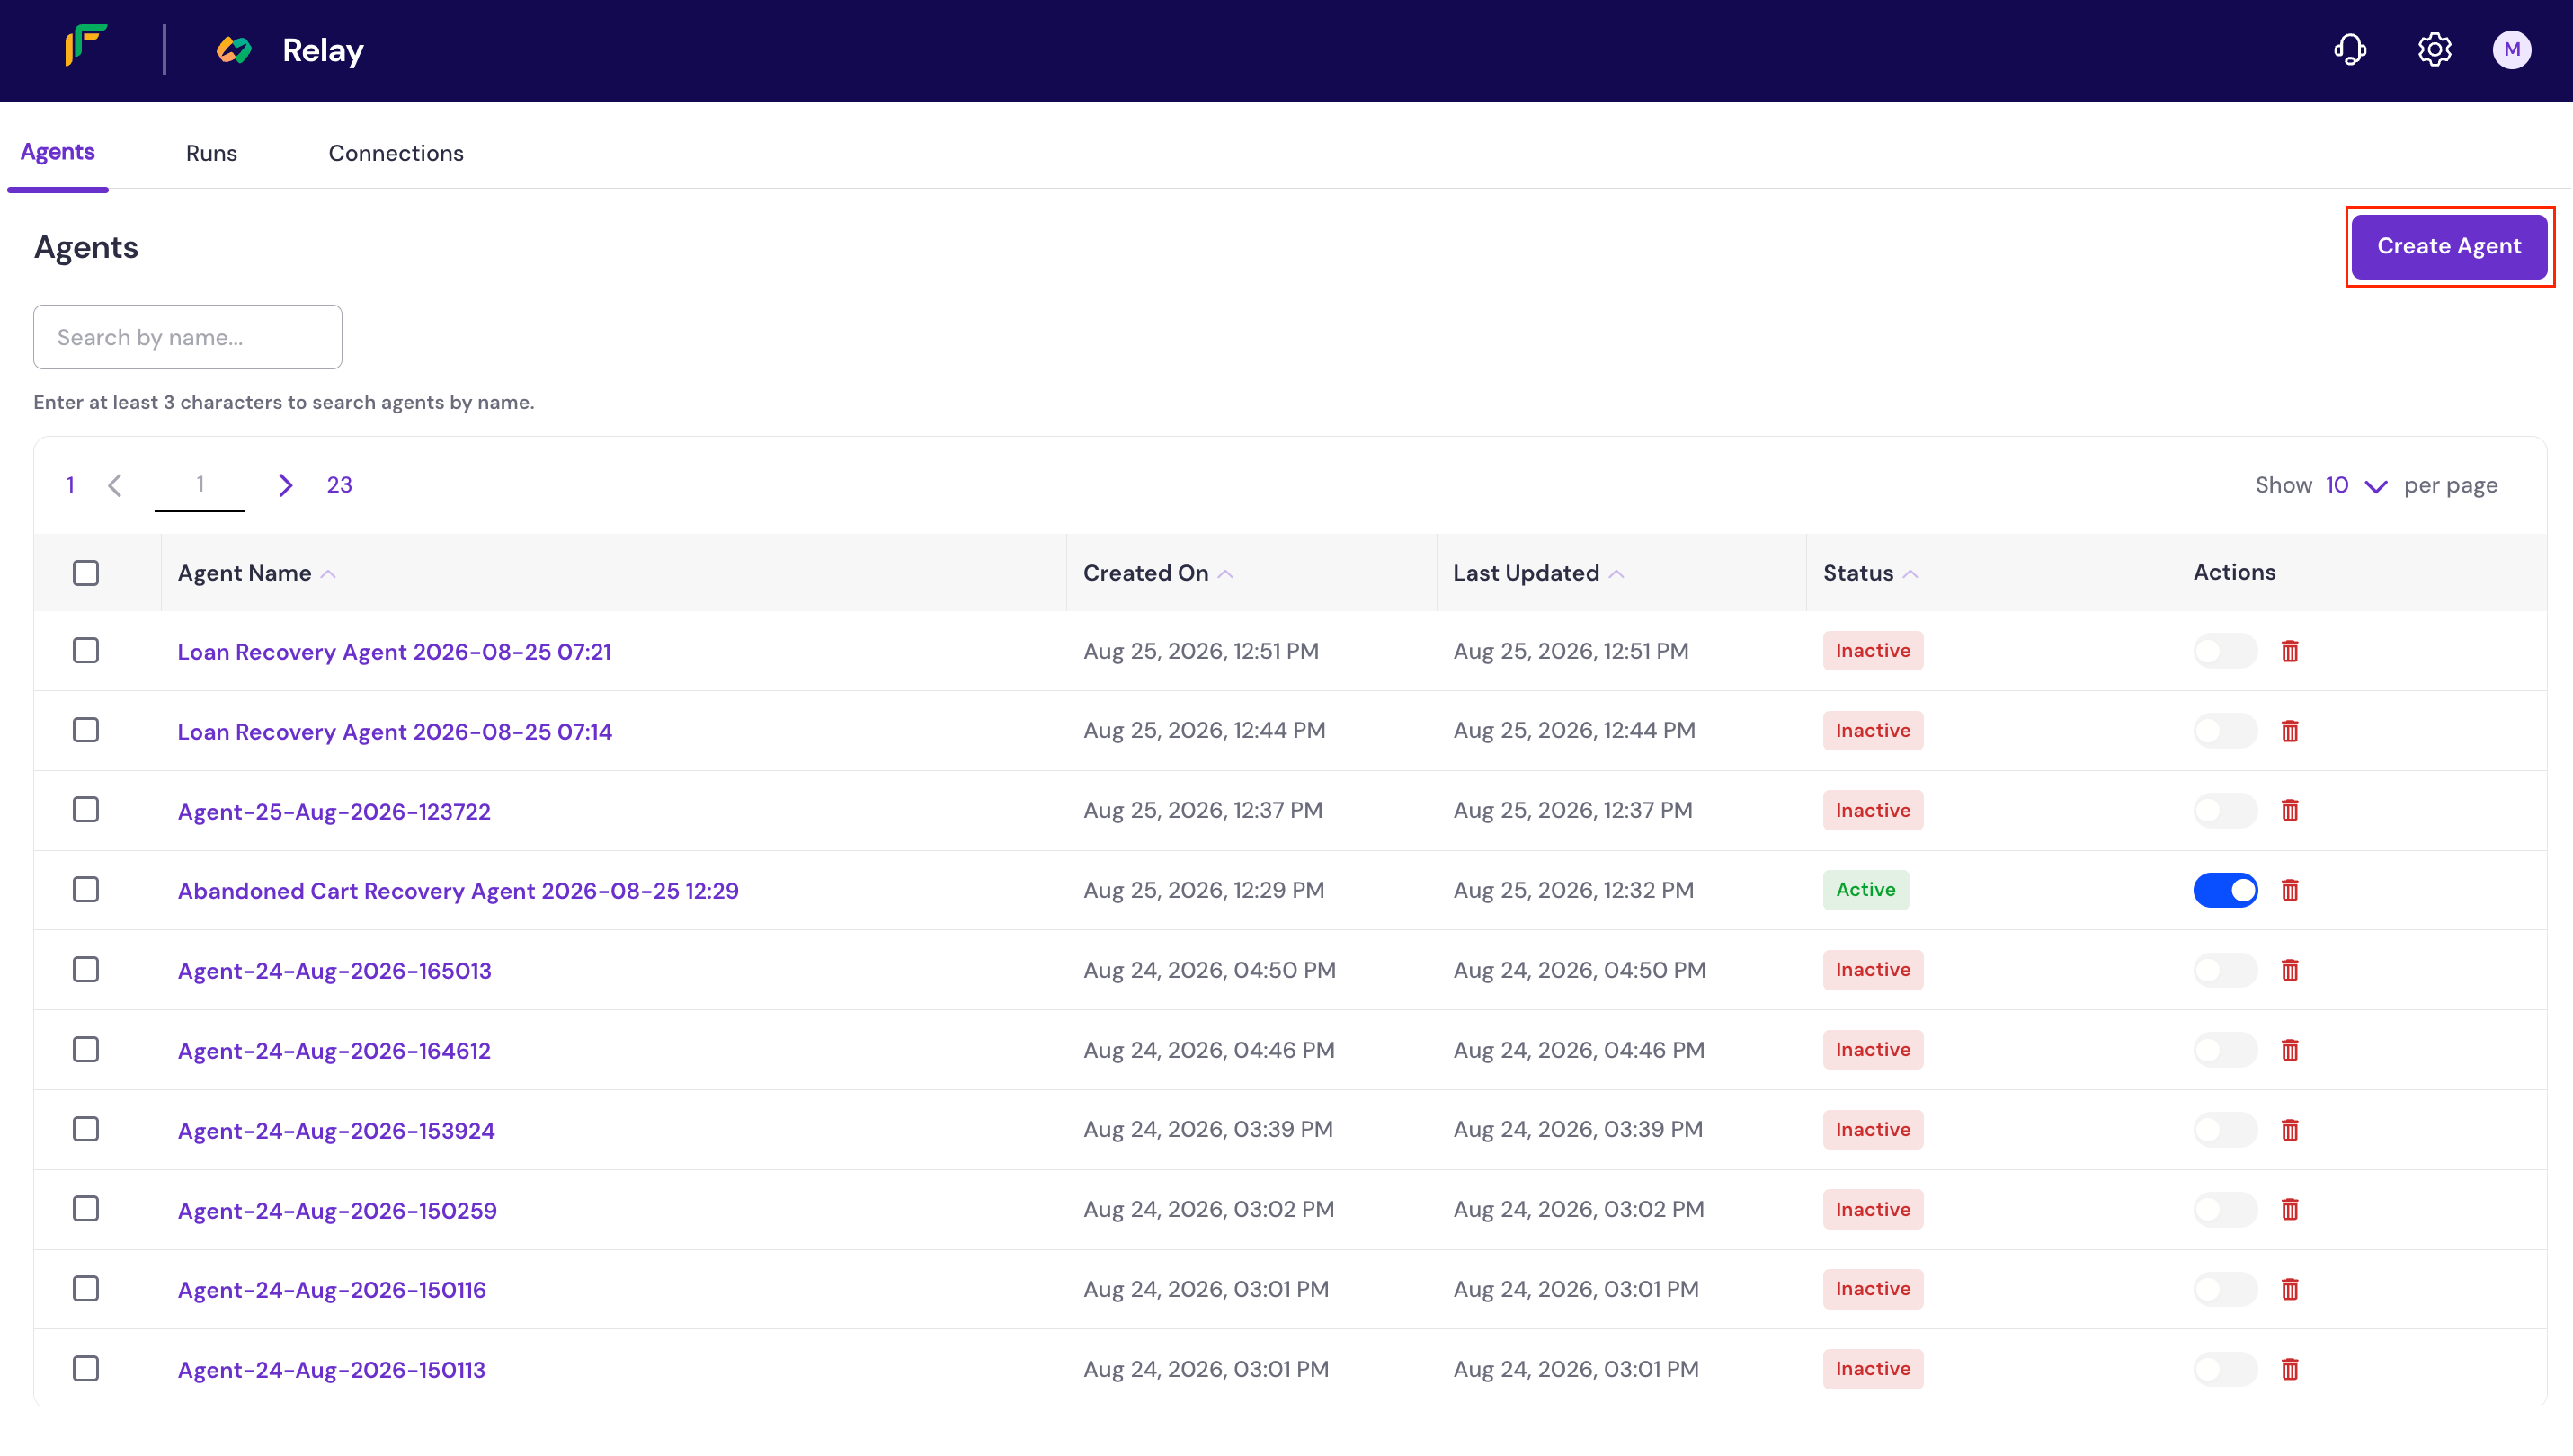 Both options open the same canvas, displaying two default nodes: **Add a trigger here** and **End**. You can rename the agent at any time by editing the name in the header at the top of the canvas.
A trigger defines the event, schedule, or inbound call that starts the agent. On the canvas, click the **Add a trigger here** node. A panel opens on the right asking **What triggers this agent?** Select a trigger type and follow the steps in the [Trigger types](#trigger-types) section.
After configuring the trigger, add one or more nodes to define what the agent does. On the canvas, click the **+ Add step** button that appears between the trigger node and the **End** node, then follow the steps in the [Node types](#node-types) section.
You can repeat this step to chain multiple nodes and build a multi-step agent. After you configure a node, a new **+ Add step** button appears between the last node and the **End** node.
The **End** node marks the completion of the agent and cannot be removed or repositioned. All branches in the flow must connect to the **End** node.
After configuring all triggers and nodes, you can activate the agent directly from the canvas or from the Relay dashboard.
* **From the canvas**: In the top-right corner of the canvas, click the **Draft** toggle. The status changes to **Active**.
* **From the Relay dashboard**: Click the back arrow at the top left of the canvas to return to the dashboard. In the **Actions** column for your agent, click the toggle to activate it. The status changes to **Active**.
You can pause an agent at any time by toggling the switch off. The status changes to **Paused**. To delete an agent, click the delete icon in the **Actions** column on the Relay dashboard, or select **Delete** from the canvas menu. For details, see [Agent canvas menu](#agent-canvas-menu).
## Test an agent
You can test an agent at any time from the canvas to verify that it is configured correctly before activating it.
1. On the canvas, click **Test flow** in the top-right corner. The **Sample Data** panel opens, displaying auto-generated sample data for the configured trigger event.
2. Review the sample data to confirm it reflects the expected trigger payload.
3. Click **Execute** to run the test.
If the agent runs successfully, a green confirmation message reading **Execution started successfully** appears at the bottom of the canvas. To review the results in detail, go to the **Runs** tab on the Relay dashboard.
If the test does not execute as expected, review your trigger configuration and node settings. Ensure that all required fields are filled in and that any app-based connections are active. For connection setup, see [Setting up Connections](/docs/tools-ai/relay/add-connections).
## Agent canvas menu
The canvas header includes an ellipsis (**⋯**) menu with the following options.
| Menu item | Description |
| ------------------- | ----------------------------------------------------------------- |
| Versions | Views and restores previous saved versions of the agent. |
| Runs | Opens the run history filtered to this agent. |
| Update initial Data | Edits the sample data used when testing the agent. |
| Duplicate agent | Creates a copy of this agent, including its trigger and nodes. |
| Save as a Template | Saves this agent as a reusable template for the template gallery. |
| Delete | Permanently deletes this agent. |
Deleting an agent from the canvas menu is permanent and cannot be undone.
## Trigger types
A trigger defines when an agent starts. The following trigger types are available.
Use a schedule-based trigger to run your agent automatically at a defined time interval.
1. Click the **Add a trigger here** node on the canvas. The **What triggers this agent?** panel opens.
2. Select **Schedule Based**. The Schedule Based Triggers panel opens.
3. Select **Scheduled**, then select **Simple Schedule**. The Simple Schedule configuration panel opens.
4. From the **Trigger Interval** dropdown, select how often the agent should run. See the [Trigger intervals](#trigger-intervals) reference for available options and additional fields.
5. Fill in any additional fields that appear based on your selected interval (for example, **Trigger at Hour**, **Trigger at Minute**, or **Trigger at Day of Month**).
6. (Optional) From the **Input Template** dropdown, select a template that defines the data structure passed into the agent. Available templates include **Failed Transactions** and **Transaction Summary (Today & Yesterday)**.
7. Click **Confirm Selection**. The canvas updates to show the **Simple Schedule** trigger node.
The following intervals are available in the **Trigger Interval** dropdown. Some intervals display additional configuration fields after selection.
| Interval | Behaviour | Additional fields |
| -------- | -------------------- | --------------------------------------------------------------------- |
| Minutes | Runs every X minutes | None |
| Hours | Runs every X hours | None |
| Days | Runs every X days | Trigger at Hour, Trigger at Minute |
| Weeks | Runs every X weeks | Trigger at Hour, Trigger at Minute, Trigger at Day of Week |
| Months | Runs every X months | Trigger at Hour, Trigger at Minute, Trigger at Day of Month (1 to 31) |
Use an event-based trigger to run your agent instantly when a specific payment-related event occurs.
1. Click the **Add a trigger here** node on the canvas. The **What triggers this agent?** panel opens.
2. Select **Event Based**. The Event Based Triggers panel opens, listing the available event categories.
3. Select a category, such as **Payment**, **Refund**, or **Dispute**, to expand it and view the available events.
4. Select the event you want to trigger the agent. The event configuration panel opens. See the [Supported events](#supported-events) reference for a full list.
5. (Optional) Add one or more conditions to target a specific subset of events.
* The first condition block is labelled **If**. Use the three dropdowns to select an **attribute** (for example, **Amount**, **Card Country**, **Bank Name**, or **Payment Gateway**), an **operator** (for example, **Equals**), and a **value**.
* To add another condition, click **+ Add more**. The new block includes an **AND/OR** toggle to control how conditions are combined.
* To remove a condition block, click **Remove** on that block.
**Example**: To trigger an agent only for payments above a defined amount from India, set: **Amount** > **Greater than** > **\[value]** AND **Card Country** > **Equals** > **IN**.
Conditions are optional. If no conditions are added, the agent triggers for every occurrence of the selected event.
6. Click **Confirm Selection**. The canvas updates to show the selected event as the trigger node.
The following event categories and events are available for event-based triggers.
| Category | Event | Description |
| -------- | ------------------- | --------------------------------------------------- |
| Payment | Payment Success | Runs when a customer completes a payment. |
| Payment | Payment Failed | Runs when a payment attempt fails. |
| Payment | Payment Dropped | Runs when a customer abandons checkout. |
| Refund | Refund Success | Runs when a refund is completed. |
| Refund | Refund Cancelled | Runs when a refund is cancelled or reversed. |
| Refund | Auto Refund Success | Runs when the system automatically issues a refund. |
| Dispute | Dispute Created | Runs when a new chargeback or retrieval is raised. |
| Dispute | Dispute Updated | Runs when a dispute status changes. |
| Dispute | Dispute Closed | Runs when a dispute is resolved. |
Use an Inbound Webhook trigger to start your agent when an external system sends an HTTP POST request to a unique webhook URL.
1. Click the **Add a trigger here** node on the canvas. The **What triggers this agent?** panel opens.
2. Select **Inbound Webhook**. The **Inbound Webhook Triggers** panel opens, listing one item, **Inbound Webhook**.
3. Select **Inbound Webhook**. The **Inbound Webhook** configuration panel opens, displaying an auto-generated **Webhook Name** (for example, `picnic-bargain-maple`) and a read-only **Webhook URL**.
4. (Optional) Click **Edit** at the top right of the panel to rename the **Webhook Name**.
5. Click the copy icon next to **Webhook URL**, then send a POST request to this URL from your external system to trigger the agent.
6. (Optional) Click **Regenerate** to generate a new **Webhook URL**.
7. Click **Confirm Selection**. The canvas updates to show the **Inbound Webhook** trigger node.
Click **Back to Events** at any point to return to the trigger-type panel without saving your selection.
## Node types
A node defines what the agent does after the trigger fires. The following node types are available.
Select **Action in an app** to perform an operation in an external service.
1. On the canvas, click **+ Add step**. The **What happens next?** panel opens.
2. Select **Action in an app**. A list of available apps appears. See [Supported apps](#supported-apps) for a full list.
3. Select the app you want to use. A list of available actions for that app appears.
4. Select the action to perform. The action configuration panel opens.
5. From the **Connection** dropdown, select an existing connection for the selected app.
Connection requirements vary by app. Apps such as Gmail, Google Sheets, and Slack require a pre-configured connection. The **Connection** dropdown lists only connections that have been set up in the **Connections** tab. If the required connection does not appear, set it up before configuring this action. For steps, see [Setting up Connections](/docs/tools-ai/relay/add-connections).
6. Fill in all required fields for the selected action. Required fields are marked with an asterisk (\*). Optional fields can be left blank.
7. (Optional) Under **Sample Data**, click **Test Node** to validate the action configuration. A successful test displays a confirmation; if the test fails, review the connection and field values before proceeding.
8. Click **Save** to add the node to the canvas.
The following apps and services are available for app-based actions.
| App or service | Description |
| --------------------- | ------------------------------------------------------------------------------------ |
| Cashfree Payments | Process payments using Cashfree Payments. |
| Cashfree Payouts | Send payouts and disburse funds using Cashfree Payouts. |
| Cashfree Secure ID | Verify user identity using Cashfree Secure ID. |
| Cashfree Subscription | Manage recurring payments using Cashfree Subscriptions. |
| Google Sheets | Create and manage spreadsheets; add rows, create spreadsheets, or create worksheets. |
| Slack | Send messages to channels or users via a Slack workspace. |
| Gmail | Send emails or request approvals through a Gmail account. |
| HTTP | Send HTTP requests to an external endpoint and receive responses. |
| WhatsApp Business | Send messages via a WhatsApp Business account. |
| Google Gemini | Use Google Gemini AI models for content generation and analysis. |
| OpenAI | Access ChatGPT models for a wide range of AI-powered actions. |
| Calendly | Manage scheduling actions via a Calendly account. |
| Bolna AI | Use Bolna AI's voice calling platform for AI-powered customer calls. |
| Osvi AI | AI phone calling platform for outbound voice agents. |
| Sarvam AI | Use the tools offered by Sarvam. |
| Anthropic Claude | Use Anthropic Claude models for content generation and analysis. |
Select **Flow Control** to route the agent along different paths based on conditions. A Flow Control node splits the canvas into branches, and each branch can contain its own sequence of actions.
1. On the canvas, click **+ Add step**. The **What happens next?** panel opens.
2. Select **Flow Control**. The Flow Control panel opens.
3. Select **Router**. The **Router** node is added to the canvas and displays two default branches: **Branch 1** and **Otherwise**.
* **Branch 1**: The primary conditional path. You can add conditions and actions specific to this branch.
* **Otherwise**: The fallback path that runs when none of the other branch conditions are met.
4. Under any branch, click **Add step**. The **What happens next?** panel opens, allowing you to add either of the following.
* **Action in an app**: Perform an operation in an external service. See the **Action in an app** tab for configuration steps.
* **Flow Control**: Add another Router node to create further branching within the branch.
Repeat this for each branch as needed.
Each branch is independent. Actions added under **Branch 1** do not affect the **Otherwise** branch, and vice versa.
5. (Optional) To add more conditional paths, click the edit icon on the **Router** node and add additional branches. Each new branch appears alongside the existing ones on the canvas.
6. (Optional) To remove a branch, click the delete icon on the **Router** node and select the branch to remove.
The **Otherwise** branch cannot be removed, as it serves as the default fallback path.
7. Click **Save** to add the **Router** node to the canvas.
All branches in a **Router** node converge back to a single **End** node. You can continue adding shared nodes after the Router by clicking the **+ Add step** button that appears below all branches, before the **End** node.
## What's next
View, edit, pause, or delete existing agents from the Relay dashboard.
Set up connections to external apps and services required for app-based actions.
Both options open the same canvas, displaying two default nodes: **Add a trigger here** and **End**. You can rename the agent at any time by editing the name in the header at the top of the canvas.
A trigger defines the event, schedule, or inbound call that starts the agent. On the canvas, click the **Add a trigger here** node. A panel opens on the right asking **What triggers this agent?** Select a trigger type and follow the steps in the [Trigger types](#trigger-types) section.
After configuring the trigger, add one or more nodes to define what the agent does. On the canvas, click the **+ Add step** button that appears between the trigger node and the **End** node, then follow the steps in the [Node types](#node-types) section.
You can repeat this step to chain multiple nodes and build a multi-step agent. After you configure a node, a new **+ Add step** button appears between the last node and the **End** node.
The **End** node marks the completion of the agent and cannot be removed or repositioned. All branches in the flow must connect to the **End** node.
After configuring all triggers and nodes, you can activate the agent directly from the canvas or from the Relay dashboard.
* **From the canvas**: In the top-right corner of the canvas, click the **Draft** toggle. The status changes to **Active**.
* **From the Relay dashboard**: Click the back arrow at the top left of the canvas to return to the dashboard. In the **Actions** column for your agent, click the toggle to activate it. The status changes to **Active**.
You can pause an agent at any time by toggling the switch off. The status changes to **Paused**. To delete an agent, click the delete icon in the **Actions** column on the Relay dashboard, or select **Delete** from the canvas menu. For details, see [Agent canvas menu](#agent-canvas-menu).
## Test an agent
You can test an agent at any time from the canvas to verify that it is configured correctly before activating it.
1. On the canvas, click **Test flow** in the top-right corner. The **Sample Data** panel opens, displaying auto-generated sample data for the configured trigger event.
2. Review the sample data to confirm it reflects the expected trigger payload.
3. Click **Execute** to run the test.
If the agent runs successfully, a green confirmation message reading **Execution started successfully** appears at the bottom of the canvas. To review the results in detail, go to the **Runs** tab on the Relay dashboard.
If the test does not execute as expected, review your trigger configuration and node settings. Ensure that all required fields are filled in and that any app-based connections are active. For connection setup, see [Setting up Connections](/docs/tools-ai/relay/add-connections).
## Agent canvas menu
The canvas header includes an ellipsis (**⋯**) menu with the following options.
| Menu item | Description |
| ------------------- | ----------------------------------------------------------------- |
| Versions | Views and restores previous saved versions of the agent. |
| Runs | Opens the run history filtered to this agent. |
| Update initial Data | Edits the sample data used when testing the agent. |
| Duplicate agent | Creates a copy of this agent, including its trigger and nodes. |
| Save as a Template | Saves this agent as a reusable template for the template gallery. |
| Delete | Permanently deletes this agent. |
Deleting an agent from the canvas menu is permanent and cannot be undone.
## Trigger types
A trigger defines when an agent starts. The following trigger types are available.
Use a schedule-based trigger to run your agent automatically at a defined time interval.
1. Click the **Add a trigger here** node on the canvas. The **What triggers this agent?** panel opens.
2. Select **Schedule Based**. The Schedule Based Triggers panel opens.
3. Select **Scheduled**, then select **Simple Schedule**. The Simple Schedule configuration panel opens.
4. From the **Trigger Interval** dropdown, select how often the agent should run. See the [Trigger intervals](#trigger-intervals) reference for available options and additional fields.
5. Fill in any additional fields that appear based on your selected interval (for example, **Trigger at Hour**, **Trigger at Minute**, or **Trigger at Day of Month**).
6. (Optional) From the **Input Template** dropdown, select a template that defines the data structure passed into the agent. Available templates include **Failed Transactions** and **Transaction Summary (Today & Yesterday)**.
7. Click **Confirm Selection**. The canvas updates to show the **Simple Schedule** trigger node.
The following intervals are available in the **Trigger Interval** dropdown. Some intervals display additional configuration fields after selection.
| Interval | Behaviour | Additional fields |
| -------- | -------------------- | --------------------------------------------------------------------- |
| Minutes | Runs every X minutes | None |
| Hours | Runs every X hours | None |
| Days | Runs every X days | Trigger at Hour, Trigger at Minute |
| Weeks | Runs every X weeks | Trigger at Hour, Trigger at Minute, Trigger at Day of Week |
| Months | Runs every X months | Trigger at Hour, Trigger at Minute, Trigger at Day of Month (1 to 31) |
Use an event-based trigger to run your agent instantly when a specific payment-related event occurs.
1. Click the **Add a trigger here** node on the canvas. The **What triggers this agent?** panel opens.
2. Select **Event Based**. The Event Based Triggers panel opens, listing the available event categories.
3. Select a category, such as **Payment**, **Refund**, or **Dispute**, to expand it and view the available events.
4. Select the event you want to trigger the agent. The event configuration panel opens. See the [Supported events](#supported-events) reference for a full list.
5. (Optional) Add one or more conditions to target a specific subset of events.
* The first condition block is labelled **If**. Use the three dropdowns to select an **attribute** (for example, **Amount**, **Card Country**, **Bank Name**, or **Payment Gateway**), an **operator** (for example, **Equals**), and a **value**.
* To add another condition, click **+ Add more**. The new block includes an **AND/OR** toggle to control how conditions are combined.
* To remove a condition block, click **Remove** on that block.
**Example**: To trigger an agent only for payments above a defined amount from India, set: **Amount** > **Greater than** > **\[value]** AND **Card Country** > **Equals** > **IN**.
Conditions are optional. If no conditions are added, the agent triggers for every occurrence of the selected event.
6. Click **Confirm Selection**. The canvas updates to show the selected event as the trigger node.
The following event categories and events are available for event-based triggers.
| Category | Event | Description |
| -------- | ------------------- | --------------------------------------------------- |
| Payment | Payment Success | Runs when a customer completes a payment. |
| Payment | Payment Failed | Runs when a payment attempt fails. |
| Payment | Payment Dropped | Runs when a customer abandons checkout. |
| Refund | Refund Success | Runs when a refund is completed. |
| Refund | Refund Cancelled | Runs when a refund is cancelled or reversed. |
| Refund | Auto Refund Success | Runs when the system automatically issues a refund. |
| Dispute | Dispute Created | Runs when a new chargeback or retrieval is raised. |
| Dispute | Dispute Updated | Runs when a dispute status changes. |
| Dispute | Dispute Closed | Runs when a dispute is resolved. |
Use an Inbound Webhook trigger to start your agent when an external system sends an HTTP POST request to a unique webhook URL.
1. Click the **Add a trigger here** node on the canvas. The **What triggers this agent?** panel opens.
2. Select **Inbound Webhook**. The **Inbound Webhook Triggers** panel opens, listing one item, **Inbound Webhook**.
3. Select **Inbound Webhook**. The **Inbound Webhook** configuration panel opens, displaying an auto-generated **Webhook Name** (for example, `picnic-bargain-maple`) and a read-only **Webhook URL**.
4. (Optional) Click **Edit** at the top right of the panel to rename the **Webhook Name**.
5. Click the copy icon next to **Webhook URL**, then send a POST request to this URL from your external system to trigger the agent.
6. (Optional) Click **Regenerate** to generate a new **Webhook URL**.
7. Click **Confirm Selection**. The canvas updates to show the **Inbound Webhook** trigger node.
Click **Back to Events** at any point to return to the trigger-type panel without saving your selection.
## Node types
A node defines what the agent does after the trigger fires. The following node types are available.
Select **Action in an app** to perform an operation in an external service.
1. On the canvas, click **+ Add step**. The **What happens next?** panel opens.
2. Select **Action in an app**. A list of available apps appears. See [Supported apps](#supported-apps) for a full list.
3. Select the app you want to use. A list of available actions for that app appears.
4. Select the action to perform. The action configuration panel opens.
5. From the **Connection** dropdown, select an existing connection for the selected app.
Connection requirements vary by app. Apps such as Gmail, Google Sheets, and Slack require a pre-configured connection. The **Connection** dropdown lists only connections that have been set up in the **Connections** tab. If the required connection does not appear, set it up before configuring this action. For steps, see [Setting up Connections](/docs/tools-ai/relay/add-connections).
6. Fill in all required fields for the selected action. Required fields are marked with an asterisk (\*). Optional fields can be left blank.
7. (Optional) Under **Sample Data**, click **Test Node** to validate the action configuration. A successful test displays a confirmation; if the test fails, review the connection and field values before proceeding.
8. Click **Save** to add the node to the canvas.
The following apps and services are available for app-based actions.
| App or service | Description |
| --------------------- | ------------------------------------------------------------------------------------ |
| Cashfree Payments | Process payments using Cashfree Payments. |
| Cashfree Payouts | Send payouts and disburse funds using Cashfree Payouts. |
| Cashfree Secure ID | Verify user identity using Cashfree Secure ID. |
| Cashfree Subscription | Manage recurring payments using Cashfree Subscriptions. |
| Google Sheets | Create and manage spreadsheets; add rows, create spreadsheets, or create worksheets. |
| Slack | Send messages to channels or users via a Slack workspace. |
| Gmail | Send emails or request approvals through a Gmail account. |
| HTTP | Send HTTP requests to an external endpoint and receive responses. |
| WhatsApp Business | Send messages via a WhatsApp Business account. |
| Google Gemini | Use Google Gemini AI models for content generation and analysis. |
| OpenAI | Access ChatGPT models for a wide range of AI-powered actions. |
| Calendly | Manage scheduling actions via a Calendly account. |
| Bolna AI | Use Bolna AI's voice calling platform for AI-powered customer calls. |
| Osvi AI | AI phone calling platform for outbound voice agents. |
| Sarvam AI | Use the tools offered by Sarvam. |
| Anthropic Claude | Use Anthropic Claude models for content generation and analysis. |
Select **Flow Control** to route the agent along different paths based on conditions. A Flow Control node splits the canvas into branches, and each branch can contain its own sequence of actions.
1. On the canvas, click **+ Add step**. The **What happens next?** panel opens.
2. Select **Flow Control**. The Flow Control panel opens.
3. Select **Router**. The **Router** node is added to the canvas and displays two default branches: **Branch 1** and **Otherwise**.
* **Branch 1**: The primary conditional path. You can add conditions and actions specific to this branch.
* **Otherwise**: The fallback path that runs when none of the other branch conditions are met.
4. Under any branch, click **Add step**. The **What happens next?** panel opens, allowing you to add either of the following.
* **Action in an app**: Perform an operation in an external service. See the **Action in an app** tab for configuration steps.
* **Flow Control**: Add another Router node to create further branching within the branch.
Repeat this for each branch as needed.
Each branch is independent. Actions added under **Branch 1** do not affect the **Otherwise** branch, and vice versa.
5. (Optional) To add more conditional paths, click the edit icon on the **Router** node and add additional branches. Each new branch appears alongside the existing ones on the canvas.
6. (Optional) To remove a branch, click the delete icon on the **Router** node and select the branch to remove.
The **Otherwise** branch cannot be removed, as it serves as the default fallback path.
7. Click **Save** to add the **Router** node to the canvas.
All branches in a **Router** node converge back to a single **End** node. You can continue adding shared nodes after the Router by clicking the **+ Add step** button that appears below all branches, before the **End** node.
## What's next
View, edit, pause, or delete existing agents from the Relay dashboard.
Set up connections to external apps and services required for app-based actions.