Create a payment link
You can create an unlimited number of payment links to collect payments from customers and track their payment status easily.- Dashboard
- API
- Log in to the Merchant Dashboard.
- Navigate to the Payment Links Dashboard > All.
- Click the Create Payment Link button.
- Select the payment link type:
- All payment methods: Allows customers to pay using any available payment method.
- Only UPI: Restricts payment to UPI methods only.
- Fill in the Payment reason field with a description of the payment. For example, enter shoes if you are selling footwear.
- Fill in the amount details:
- Select the currency type.
- Enter the exact amount to be paid.
- Optionally, enable Allow partial payment and set a minimum amount if you want to accept partial payments.
- Complete the customer details section:
- Phone number (required): Enter the customer’s mobile number. This will be used to send SMS notifications and payment confirmations.
- Select the notification preferences:
- Check the Send SMS checkbox to send the payment link via SMS.
- Check the Send WhatsApp checkbox to send the payment link via WhatsApp. For more information, refer to WhatsApp Payment Links.
- Email ID (optional): Enter the customer’s email address to send payment link and receipt via email.
- Name (optional): Enter the customer’s full name for personalised communication and record keeping.
- Click the Create & Send button to create the payment link and share it with your customer.
UPI payment link
UPI payment links are unique URLs that let customers instantly pay using any UPI app (like Google Pay, PhonePe, or BHIM). When clicked, these links automatically open the customer’s preferred UPI app with all payment details pre-filled. To create a UPI payment link, follow these steps:- Navigate to Payment Gateway > Payment Links > Create Payment Link.
- Under Payment link type select One-time (UPI only).
Payment link options
Send automatic reminders
Send automatic reminders
- Based on payment link creation date - 1, 2, 3, 7, 14 days after creating the link
- Based on payment link expiry date - 1, 2, 3, 7, 14 days before the payment link expires
Custom thank you message
Custom thank you message
Create via batch upload
To use the batch feature, fill out the Support Form with your business requirements. Cashfree Payments verifies the details and activates the feature for your account. While the feature is being activated, you can test the flow in the test environment. Use the batch feature to create multiple payment links at once. Add all required details in a single file following the specified format, and upload it in the batch section. Download the sample file to check the required fields for the batch upload.Track orders and payments
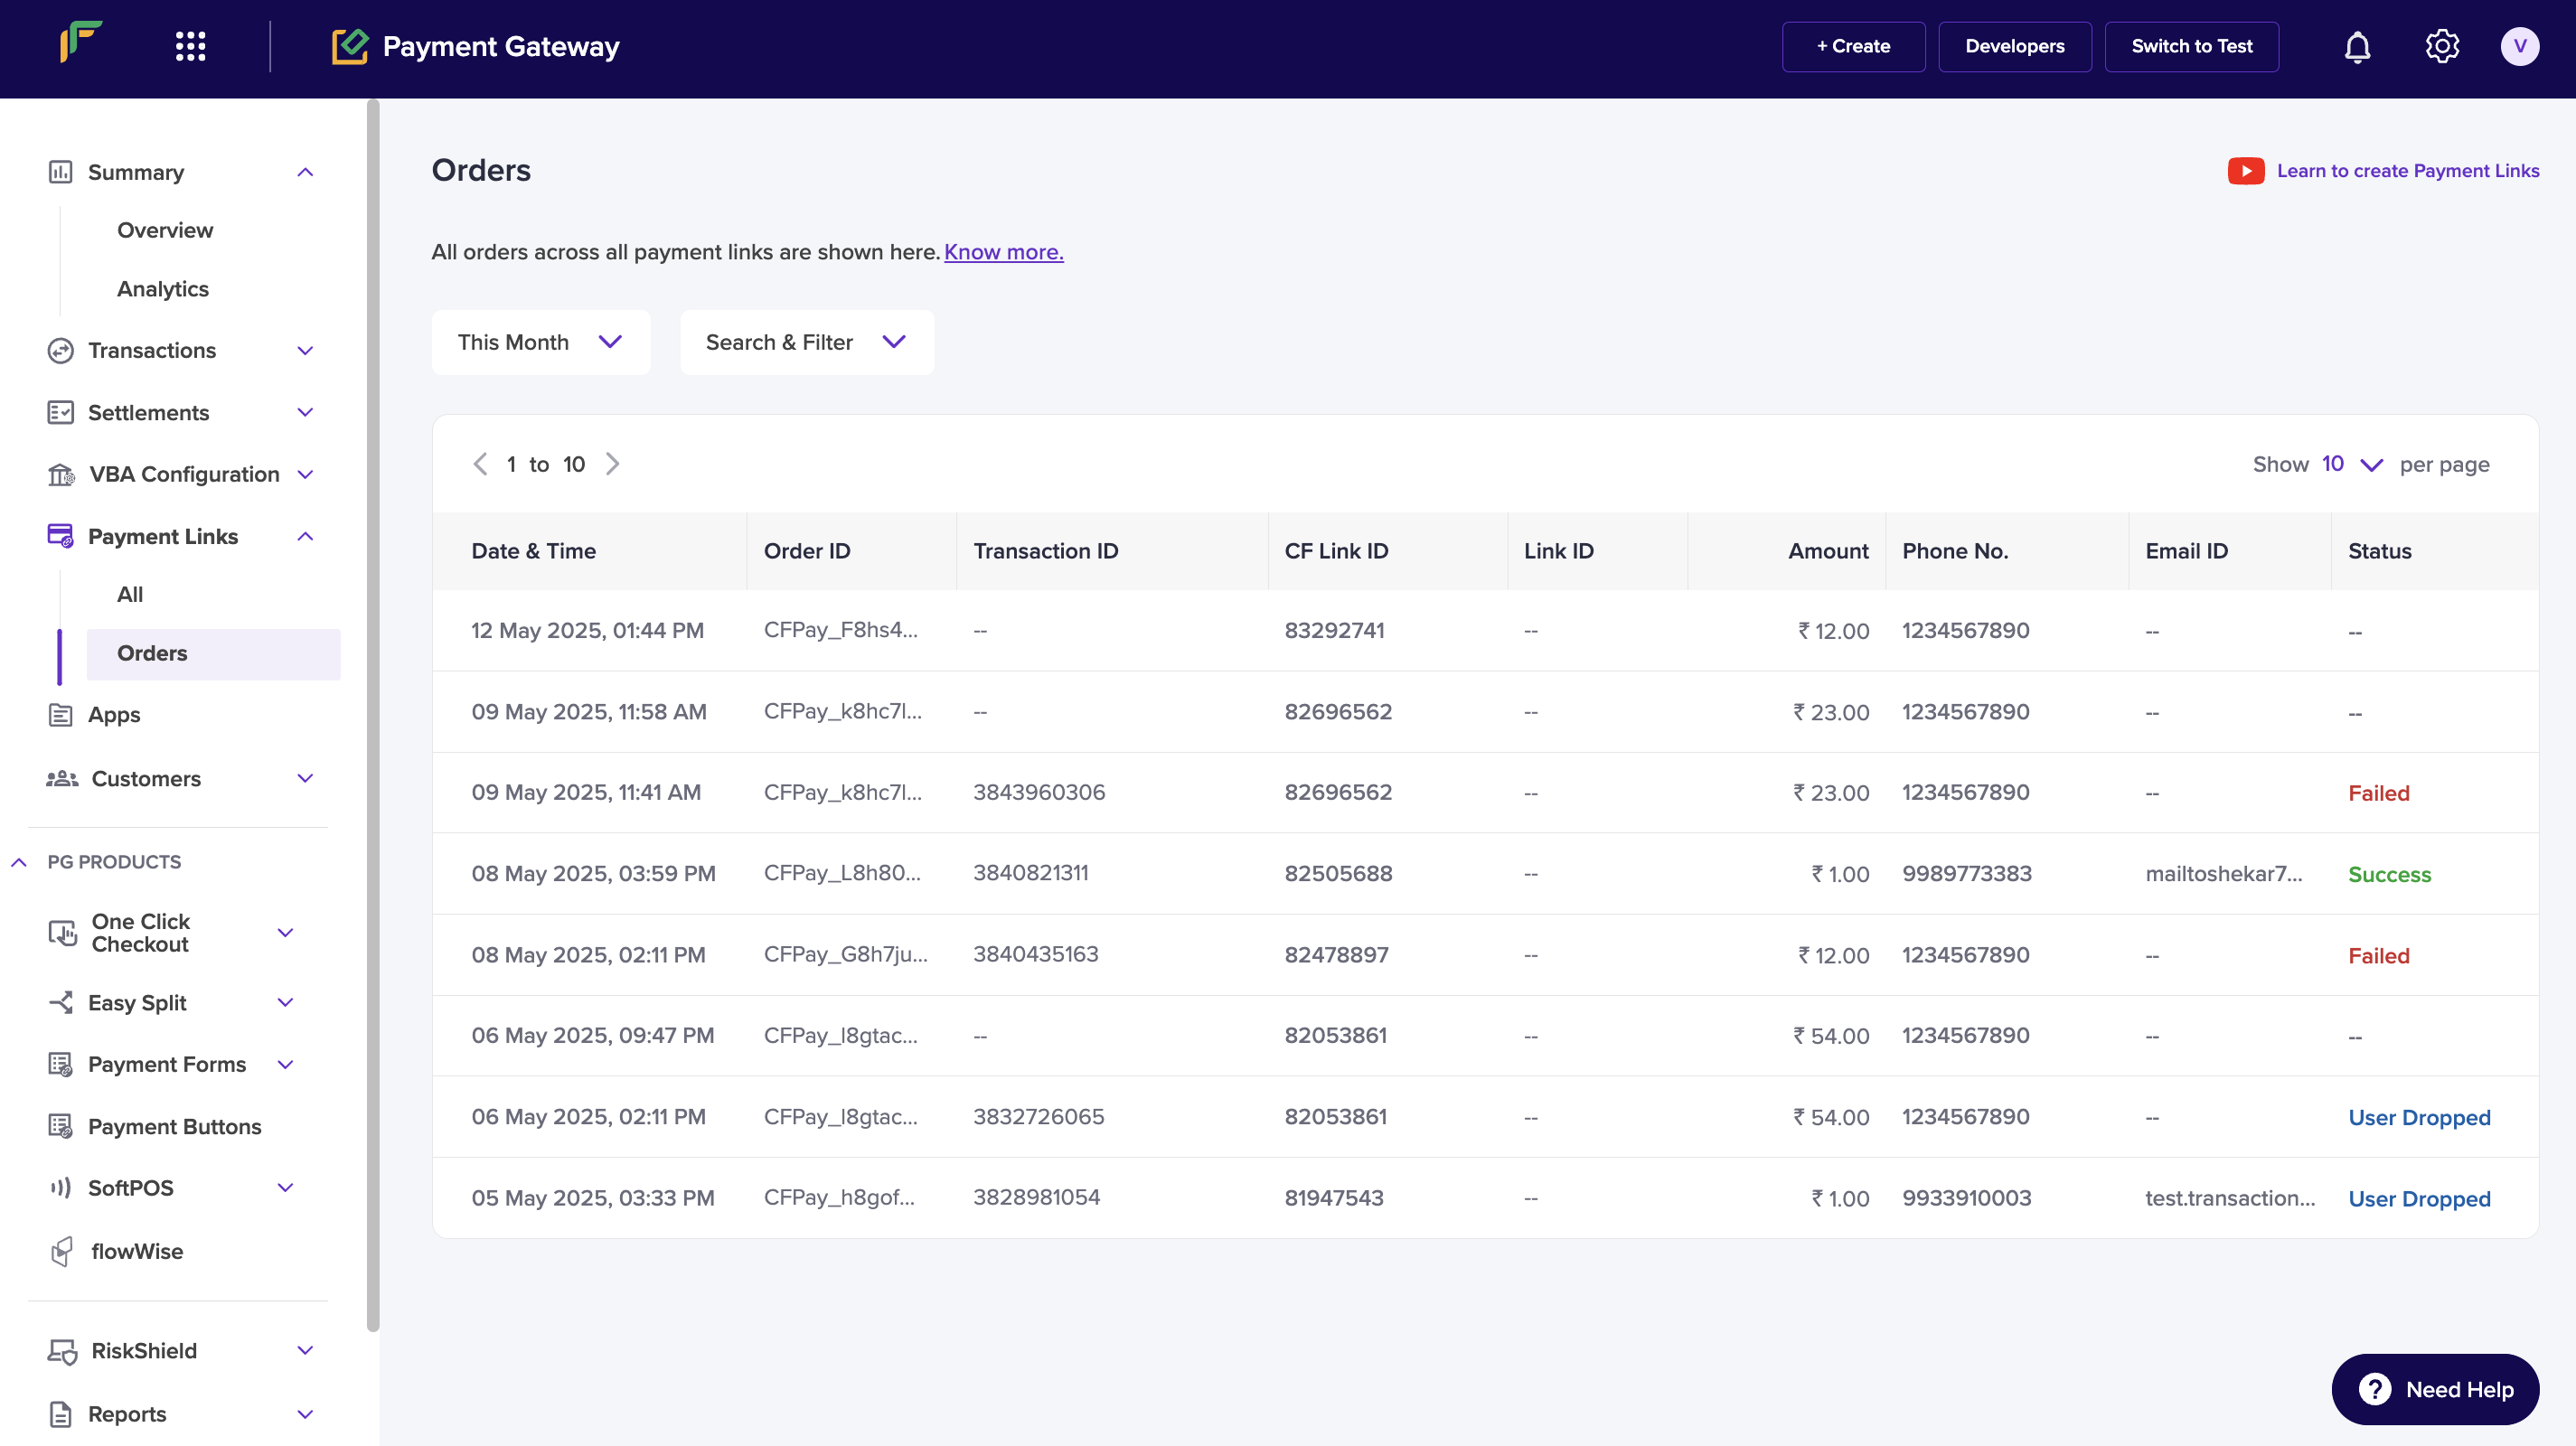
Each time a customer opens a payment link and attempts a payment, a new order is created for that link. This lets you track how many times the customer clicked the link before completing the full payment. You can use this information to follow up with customers and improve your conversion rate. To view order details for a payment link:- Navigate to Payment Gateway Dashboard > Payment Links > Orders.
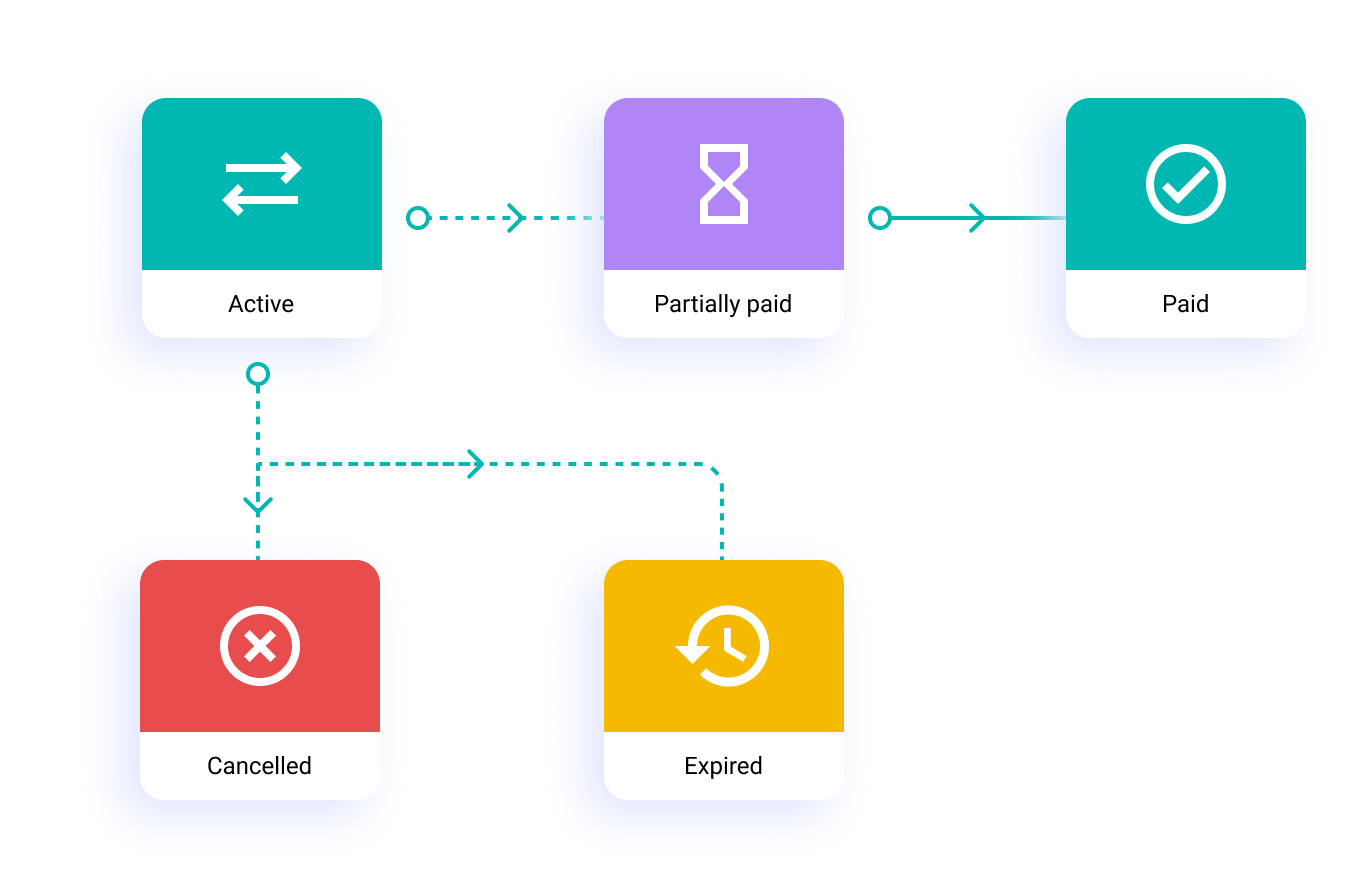
Payment link lifecycle
A payment link moves through different states from creation to completion. Here’s what each status means:ACTIVE and transitions to other states based on payment activity or administrative actions.
FAQs
How do I start using Payment Links with Cashfree?
How do I start using Payment Links with Cashfree?
All payments collected via the payment links are automatically updated in the Reports and Transactions module in Cashfree Payment Gateway.Know more in the Payment Links documentation.
Can I create a payment link for a restricted time period?
Can I create a payment link for a restricted time period?
What information do I need to provide to create Payment Links?
What information do I need to provide to create Payment Links?
How do I increase my payment link amount?
How do I increase my payment link amount?
- Sign in to the Merchant Dashboard.
- Go to Payment Gateway > Payment Links > All.
- Find the payment link in the table and click the more options icon (⋮) on that row.
- Click Edit.
- In the Edit Payment Link dialog, enter the new value in the Amount field.
- Click Update.
Can I create Payment Links in bulk?
Can I create Payment Links in bulk?
Can my customers make multiple partial payments on Payment Links?
Can my customers make multiple partial payments on Payment Links?
Are international payments supported on Payment Link?
Are international payments supported on Payment Link?
What are Orders?
What are Orders?
What are Cashfree Payment Links and why should I use them?
What are Cashfree Payment Links and why should I use them?
How can I create payment links for my business?
How can I create payment links for my business?
- Go to Payment Gateway Dashboard > Payment links > Create Payment Link
- List the reason, the amount and the customer details.
- You can also select an expiry time for the link, a custom thank you message, add a note in the more section.
-
Click create and all set!
How can I create UPI payment links for my business?
How can I create UPI payment links for my business?
- Go to Payment Gateway Dashboard > Payment Links > click Create Payment Link.
- Select the option Create UPI Link.
- In the Payment For field, explain what the customer is making the payment for. Keep this text short and clear. This information is important for customers to understand the purpose of payment. Partial payments are not allowed for the UPI payment method.
- Set the Link Expiry limit.
- Enter the customer details (phone number and email ID) to send the payment link.
- Select the option Send Auto Reminders to send payment reminders automatically to your customers.
- Enable Send Auto Reminders option to notify your customers about the payment. See Payment Links to know more.
-
You can add the Link ID and additional description for your reference. This will not be visible to your customers.
What information is required to create a Payment Link?
What information is required to create a Payment Link?
- Enable the Send SMS and Email checkboxes, and Cashfree will send the link to the customer on the provided contact information.
- Set the expiry for the link.
-
Enable partial payments if you want the customer to make payments in parts.
Can I generate a report of all payment link transactions?
Can I generate a report of all payment link transactions?
The payment link orders report provides the list and details of orders and payments made against all payment links within the selected period. This includes order details, customer details, transaction amount, payment method, transaction status, settlement UTR (if the settlement is complete), and more.To generate the payment link orders report:
- Go to Payment Gateway Dashboard > Reports.
- In the Report Type field, select Payment Link Transactions, and click Generate.
- Select the date range for which you want to view the report, and click Generate.
Do I get notified when a payment is made on a payment link?
Do I get notified when a payment is made on a payment link?
How to cancel or delete a payment link?
How to cancel or delete a payment link?
Can I create a payment link for a restricted time period?
Can I create a payment link for a restricted time period?
How do I create a TPV payment link from the dashboard?
How do I create a TPV payment link from the dashboard?
- Log in to the Merchant Dashboard.
- Navigate to Payment Gateway > Payment Links > Create Payment Link.
- Fill in the payment link details, such as amount, purpose, and customer details.
- In the Add Notes section, enter the following TPV parameters:
customer_bank_account_number: The customer’s bank account number.customer_bank_ifsc: The customer’s bank IFSC code.customer_bank_code(optional): The customer’s bank code.
- Click Create & Send to generate and share the payment link.